分类 Rust 下的文章

在 C++ 中我们可以用基类的指针来持有派生来对象,如下:

Base* p = new Derive1(1, 2, 3);

但在 Rust 中,原始指针的使用是受限的,我们需要用智能指针。下面我们来尝试一下:

let b: Box<Base> = Box::<Derive1>::new(Derive1::new(1, 2, 3));
let b: Box<Base> = Box::<Base>::new(Derive1::new(1, 2, 3));

并不顺利,编译器认为 Box<Base> 和 Box<Derive1> 以及 Base 和 Derive1 是不同的类型,因而拒绝赋值。

   --> class_impl/src/lib.rs:392:24
    |
392 |     let b: Box<Base> = Box::<Derive1>::new(Derive1::new(1, 2, 3));
    |            ---------   ^^^^^^^^^^^^^^^^^^^^^^^^^^^^^^^^^^^^^^^^^^ expected struct `Base`, found struct `Derive1`
    |            |
    |            expected due to this
error[E0308]: mismatched types
    = note: expected struct `Box<Base>`
               found struct `Box<Derive1>`
   --> class_impl/src/lib.rs:393:41
393 |     let b: Box<Base> = Box::<Base>::new(Derive1::new(1, 2, 3));
    |                                         ^^^^^^^^^^^^^^^^^^^^^ expected struct `Base`, found struct `Derive1`

我们再尝试一下 dyn 关键字:

let b: Box<dyn Base> = Box::<Derive1>::new(Derive1::new(1, 2, 3));
let b: Box<dyn Base> = Box::<dyn Base>::new(Derive1::new(1, 2, 3));

仍然被拒绝。

error[E0404]: expected trait, found struct `Base`
   --> class_impl/src/lib.rs:392:20
392 |     let b: Box<dyn Base> = Box::<Derive1>::new(Derive1::new(1, 2, 3));
    |                    ^^^^ not a trait
error[E0404]: expected trait, found struct `Base`
   --> class_impl/src/lib.rs:393:20
393 |     let b: Box<dyn Base> = Box::<dyn Base>::new(Derive1::new(1, 2, 3));
    |                    ^^^^ not a trait
error[E0404]: expected trait, found struct `Base`
   --> class_impl/src/lib.rs:393:38
393 |     let b: Box<dyn Base> = Box::<dyn Base>::new(Derive1::new(1, 2, 3));
    |                                      ^^^^ not a trait

既然编译器不支持,我们只好自己动手了。

    let d = Box::new(Derive1::new(1, 2, 3));
    let p = Box::into_raw(d) as *mut Base;
    let b = unsafe { Box::<Base>::from_raw(p) };

这样虽然可以达到目的,但太过于繁琐了,而且还使用了不安全的代码。我们将它写成一个安全的函数:

fn make_box<B, D>(d: D) -> Box<B>
{
    let d = Box::new(d);
    let p = Box::into_raw(d) as *mut B;
    unsafe { Box::<B>::from_raw(p) }
}
let b: Box<Base> = make_box(Derive1::new(1, 2, 3));

如此一来,确实方便了,但同时也带来了安全隐患,我们没有验证类型是否可以转换,也就是说,我们无法阻止用户非法使用 make_box 方法,如下:

let d: Box<Derive1> = make_box(Base::new(1, 2));
let p: Box<i32> = make_box(Vec::<String>::new());

为此我们需要改进 make_box 函数,如下:

fn make_box<B, D>(d: D) -> Box::<B>
where
    D: DerefMut<Target=B>,
{
    let p = Box::new(d);
    let d = unsafe { &mut *Box::into_raw(p) };
    let b = d as &mut B;
    unsafe { Box::<B>::from_raw(b as *mut B) }
}
let b: Box<Base> = make_box(Derive1::new(1, 2, 3));

在这里,我们先将指针转换为引用,虽然用了不安全的代码,但我们知道在这里是安全的,然后通过引用来做类型转换,而这个转换会自动调用 DerefMut::deref_mut(&mut self) 方法,实现安全的类型转换。从而确保整个函数的行为是安全的,最后再将引用转换为指针及智能指针。虽然绕了好大一圈,代码也不少,但只要编译器足够聪明,仍然是 0 开销的。
这回我们不用担心非法的调用了,但新的问题又出现了。

let b: Box<Base> = make_box(Derive2::new(1, 2, 3));

因为 Base 不是 Derive2 的直接基类,再常规的代码中,因为 Derive2 as Derive1 as Base 这样的路径存在,我们可以直接 Dervie2 as Base,但是在 Rust 模板中,这样行不通,除非我们修改函数原型,如下:

fn make_box<B, D, D1>(d: D) -> Box::<B>
where
    D: DerefMut<Target=D1>,
    D1: DerefMut<Target=B>,

这样就能够支持孙类指针赋值给基类,但又不支持子类的指针。
到这里,想要一个十全十美的方案似乎不太可能了。下面有几个不完美的方案
方案一,改用 AsMut:

fn make_box<B, D>(d: D) -> Box::<B>
where
    D: AsMut<B>,
{
    let p = Box::new(d);
    let d = unsafe { &mut *Box::into_raw(p) };
    let b = d.as_mut();
    unsafe { Box::<B>::from_raw(b as *mut B) }
}
impl AsMut<Base> for Base
{ fn as_mut(&mut self) -> &mut Base { self } }
impl AsMut<Base> for Derive1
{ fn as_mut(&mut self) -> &mut Base { unsafe { reinterpret_cast(self) } } }
impl AsMut<Derive1> for Derive1
{ fn as_mut(&mut self) -> &mut Derive1 { self } }
impl AsMut<Base> for Derive2
{ fn as_mut(&mut self) -> &mut Base { unsafe { reinterpret_cast(self) } } }
impl AsMut<Derive1> for Derive2
{ fn as_mut(&mut self) -> &mut Derive1 { unsafe { reinterpret_cast(self) } } }
impl AsMut<Derive2> for Derive2
{ fn as_mut(&mut self) -> &mut Derive2 { self } }

代价就是要为每一个基类及自身都实现 AsMut,随着类的继承层次增加,要实现的 AsMut 也会越来越多。
方案二,改用宏:

macro_rules! make_box
{
    ($expr:expr) => { Box::new($expr) };
    ($name:ident $expr:expr) =>
    {
        {
            let p = Box::new($expr);
            let d = unsafe { &mut *Box::into_raw(p) };
            let b = d as &mut $name;
            unsafe { Box::<$name>::from_raw(b as *mut $name) }
        }
    };
}
let mut v = Vec::<Box<Base>>::new();
v.push(make_box!(Base::new(1, 2)));
v.push(make_box!(Base Derive1::new(1, 2, 3)));
v.push(make_box!(Base Derive2::new(1, 2, 3)));

宏会在调用处展开,没有了模板参数的约束条件,因此无论是 Derive1 还是 Derive2 都可以直接 as Base,但不影响安全性,因为非法的 as 编译器会拒绝。
方案三,通过 typeinfo 验证:

fn make_box<B, D>(d: D) -> Box::<B>
where
    B: TypeInfoTrait,
    D: TypeInfoTrait,
{
    if B::get_typeinfo().is_base_of(D::get_typeinfo())
    {
        let b = Box::new(d);
        let p = Box::into_raw(b) as *mut B;
        unsafe { Box::<B>::from_raw(p) }
    }
    else
    {
        panic!("invalid cast.");
    }
}

通过 typeinfo 可以更准确的判断两个类型的指针是否可以赋值,因此不需要将指针转换为引用再做 as 的操作来验证,但缺点是,判断发生于运行时,而不是编译时,而且每次转换都有了代价。
我们总算是解决了派生类指针赋值给基类指针的问题,下面开始验证析构函数:

impl Drop for Base
{
    fn drop(&mut self){ println!("Base::drop."); }
}
impl Drop for Derive1
{
    fn drop(&mut self){ println!("Derive1::drop."); }
}
impl Drop for Derive2
{
    fn drop(&mut self){ println!("Derive2::drop."); }
}
let b: Box<Base> = make_box(Base::new(1, 2));
let b1: Box<Base> = make_box(Derive1::new(1, 2, 3));
let b2: Box<Base> = make_box(Derive2::new(1, 2, 3));

然而派生类的析构函数并没有被调用:

Base::drop.
Base::drop.
Base::drop.

这并不难理解,在 C++ 中要正确的调用派生类的析构函数也要走虚析构函数的。看来需要我们自己来实现智能指针和虚析构函数了,作为一个 C++ 程序员,这个不难。

上一节我们讨论了派生类中调用基类方法的问题,最终的代码实现还没有完成,本节我们要实现构造函数,这两个功能都需要对函数体进行遍历,于是我们就把它们放在一起来实现。
Rust 并无构造函数的概念,也没有统一的命名规则,只要关联函数返回值是 Self 或者类名即可。但除此之外,也可能有方法返回 Option 或者 Result<Self,E>,我们也认为它是构造函数。
在 Rust 中构造函数并不是必须的,用户也可以通过结构体的方式构造类的对象。但对于我们的类来说,构造函数是一定要有的,因为它涉及到虚表指针的初始化,是马虎不得的,因为我们的虚函数机制完全依赖于虚表指针,如果虚表指针初始化的不正确。程序出现任何异常都是有可能的。这就要求我们的类必须定义构造函数。
用户知道如何初始化成员变量,而我们知道如何初始化虚表指针,所以我们参考 C++ 的做法,由用户初始化成员变量,我们来初始化虚表指针,用户定义构造函数如下:

// Base
pub fn new(x: i32, y: i32) -> Self { Base{ x, y } }

用户不需要初始化虚指针,甚至不需要知道虚指针的存在。而我们会将构造函数转换为下面的形式:

pub fn new(x: i32, y: i32) -> Self
{
    Base { vptr: &Self::VTABLE, x, y }
}

对于派生类,我们需要暴露一些实现细节,我们需要用户显示使用 base 字段来初始化基类的部分,这样做确实是因为我们没有更好的方法。

// Derive1
pub fn new(x: i32, y: i32, z: i32) -> Self
{
    Derive1 { base: Base::new(x, y), z}
}
// Derive2
pub fn new(x: i32, y: i32, z: i32) -> Self
{
    Derive2 { base: Derive1::new(x, y, z) }
}

而上面的代码会转换为下面的形式:

// Derive1
fn new(x: i32, y: i32, z: i32) -> Self
{
    let mut ret = Derive1 { base: Base::new(x, y), z };
    ret._init_vptr();
    ret
}
// Derive2
fn new(x: i32, y: i32, z: i32) -> Self
{
    let mut ret = Derive2 { base: Derive1::new(x, y, z) };
    ret._init_vptr();
    ret
}

因为派生类无法直接访问虚表指针,因此先用基类的虚表地址来初始化虚表指针,完成之后再修改正为正确的虚表地址。
理论我们已经清楚了,接下来就是实现了。然而在实现中,构造函数可能不见得都如上面那样简单,可能在构造对象的操作前后都有复杂的逻辑,甚至可能返回类型是 Option 或者 Result<Self, ...>,也可能是用户定义的模板而我们不认识的,我们如何去转换这样的构造函数呢?

pub struct Base
{
    ...
    fn new(x: i32, y: i32) -> Self { Self { x, y } }
    fn some_func() -> Option<Self> { if ... { Some(Base::new(0, 0)) } else { None } }
    fn ok_func() -> Result<Base> { ... let r = Self { x: 0, y: 0 }; ... Ok(r) }
    fn other_func() -> OtherType<Self, ...> { ... OtherType { other_mem: Base { x: 1, y: 2 }, ...} }
}

拨开层层迷雾,我们不管它返回的类型是什么,只要函数内部有以 Self 关键字或自身类名来构造结构体的语法,就是我们的转换目标,如上文的 Self { x, y }, Self { x: 0, y: 0 }, Base { x: 1, y: 2 } 等。
现在我们的目标明确了,但要遍历函数体也不是一件容易的事,函数体内可用的语法元素非常之多,差不多意味着我们要为 syn 半数以上的类型编写遍历代码,这可不是一个小的工作量。幸好 syn 考虑到了遍历的需求,为开发者提供了 visit 和 visit_mut 模块,visit 模块用来遍历语法树,而 visit_mut 模块在遍历的同时可以修改语法树。两个模块分别通过特性 visit 和 visit-mut 来启用,下面我们启用了 visit-mut 特性,因为我们需要对修改语法树:

[dependencies]
syn = { version = "1.0", features = ["full", "extra-traits", "visit-mut"] }

接下来我们可以开始编写遍历类,如下:

pub struct InitVPTR<'a>
{
    class_name: &'a str,
    is_base_class: bool,
    blocked: bool,
}
impl<'a> VisitMut for InitVPTR<'a>
{
    fn visit_expr_mut(&mut self, expr: &mut Expr)
    {
        if !self.blocked
        {
            if let Expr::Struct(expr_stru) = expr
            {
                if let Some(seg) = expr_stru.path.segments.last()
                {
                    let name = seg.ident.to_string()
                    if self.class_name == name || "Self" == name
                    {
                        if self.is_base_class
                        {
                            self.base_class_init_vptr(expr_stru);
                        }
                        else
                        {
                            *expr = self.derive_class_init_vptr(expr_stru);
                        }
                    }
                }
            }
        }
        syn::visit_mut::visit_expr_mut(self, expr);
        self.blocked = false;
    }
}

由于 syn 提供了遍历的框架,因此我们只需要为我们需要的部分编写代码即可,在上文中我们通过遍历表达式得到了以类名或者 Self 关键字来构造结构体的表达式,接下来我们来改造结构体:

fn base_class_init_vptr(&mut self, expr_stru: &mut ExprStruct)
{
    expr_stru.fields.push(parse_quote!(vptr: &Self::VTABLE));
}
fn derive_class_init_vptr(&mut self, expr_stru: &mut ExprStruct) -> Expr
{
    self.blocked = true;
    Expr::Block(parse_quote!({ let mut ret = #expr_stru; ret._init_vptr(); ret }))
}

syn 的类型往往都比较复杂,手动构造不仅费时费力,而且还可能面临因为个别数据成员的类型定义在私有模块,而无法构造的困境,因此 syn 推荐使用 parse_quote! 宏,省时省力,可读性还好。
基类结构体的改造相对简单一些,只需添加 "vptr: &Self::VTABLE" 即可。
而派生类则是基于当前结构体构造了一个由大括号包裹的代码块,因为代码块中包含当前结构体,我们通过标记 self.blocked 标志,防止对结构体的重复循环遍历。
我们可以用 InitVPTR 类来改造构造函数了,用法也非常简单,如下:

let mut vis = visit_stmt::InitVPTR::new(class_name, true);
vis.visit_block_mut(&mut self.itemfn.block);

基类方法调用

构造函数的实现完成了,接下来我们实现在派生类虚函数中调用基类方法的问题。其实当我们处理完了构造函数,基类方法调用的问题也就迎刃而解了,两个问题的解决方法是一样的,都需要对函数体进行遍历,如下:

pub struct BaseFuncCall<'a>
{
    base_macro_name: &'a Ident,
}
impl<'a> VisitMut for BaseFuncCall<'a>
{ 
    fn visit_expr_mut(&mut self, expr: &mut Expr)
    {
        if let Expr::Call(call) = expr
        {
            if let Expr::Path(path) = &*call.func
            {
                let mut path = path.path.clone();
                if let Some(Pair::End(func)) = path.segments.pop()
                {
                    if let Some(Pair::Punctuated(class, _)) = path.segments.pop()
                    {
                        let macro_name = self.base_macro_name;
                        let args = call.args; 
                        let mut expr_macro = parse_quote!(#macro_name!(, call_super_func, #path #class #func #args));
                        expr_macro.attrs = call.attrs.clone();
                        *expr = Expr::Macro(expr_macro);
                    }
                }
            }
        }
        syn::visit_mut::visit_expr_mut(self, expr);
    }
}

首先我们找到通过 :: 进行的函数调用,并解析出了类名和函数名,然后转换为宏调用,因为属性不支持在 parse_quote! 宏中用 # 号来引用,因此是单独处理的。
BaseFuncCall 类的用法和 InitVPTR 相同:

let mut vis = visit_stmt::BaseFuncCall::new(class_name, true);
vis.visit_block_mut(&mut self.itemfn.block);

至此函数体的解析工作完成了,无论是构造函数还是基类方法调用我们都按照我们预想的工作了。本来我们预想中的很高很高的大山,在 syn::visit_mut 模块的帮助之下轻松的飞越了。终于,离我们的目标又近了一步。

上一节,我们实现了重写函数,但还有些细节还没写完,C++ 派生类重新实现的虚函数可以调用基类的实现,有时我们不需要完全重写基类的实现,只需要在基类的实现的基础上做一些小的更改即可。为支持调用基类的实现,我们需要明确指出被调用的函数是位于基类的,如下:

#[class]
pub struct Derive2 : Derive1
{
    w: i32,
    override fn func2(&self, i: i32) -> i32
    {
        self.w + Derive1::func2(self, i)
    }
    override fn func3(&self) -> i32
    {
        self.w + Derive1::func3(self)
    }
}

这里我们用 Derive1:: 前缀来表示我们想要调用基类的实现,如果没有这个前缀,就成了对函数自身的调用。我们开始实现函数:

    fn func2_impl1(&self, i: i32) -> i32
    {
        self.w + (Derive1::VTABLE.func2)(self, i)
    }
    fn func3_impl1(&self) -> i32
    {
        self.w + (Derive1::VTABLE.func3)(self)
    }

可以看到我们在派生类中对基类方法的调用是通过基类虚表实现的,而不是直接通过调用 Derive1::func2_impl0(self, i) 来实现,因为我们不能够确定 Derive1 有实现 func2 方法,但虚表总会指向一个最近的实现。
最开始我们通过操作符 :: 来识别对基类方法的调用,但 :: 操作符的作用远不止于此,我们刚刚的关注点一直在虚函数上面,而忽略了非虚函数,或者其他类的关联方法,如下:

pub struct Base
{
    ...
    pub fn non_virtual_func(&self, ...) {...}
}
#[class]
pub struct Derive2 : Derive1
{
    w: i32,
    override fn func2(&self, i: i32) -> i32
    {
        let v = Vec::new();
        v....
        let s = String::from("xxxx");
        s....
        Base::non_virtual_func(self, ...);
        self.w + Derive1::func2(self, i)
    }
}

这需要我们能够准确识别出那些类是基类,哪些方法是虚方法,为此,我们增加 class_option 系列宏来记录基类信息:

macro_rules! class_option
{
    ($($func:ident)*, $callback:ident $($params:tt)*) =>
    { $callback!($($func)* $($params)*); };
}
macro_rules! base_class_option
{
    ($($params:tt)*) => { class_option!(Base $($params)*) };
}
macro_rules! derive1_class_option
{
    ($($params:tt)*) => { base_class_option!(Derive1 $($params)*) };
}
macro_rules! derive2_class_option
{
    ($($params:tt)*) => { derive1_class_option!(Derive2 $($params)*) };
}

class_option 系列宏和之前的 vtable_option 系列宏很相似,都是回调模式。有了 class_option 系列宏,我们就可以查询一个类是否是当前类的基类,上面的代码可以转换为下面的形式:

fn func2_impl1(&self, i: i32) -> i32
{
    let v = derive1_class_option!(, call_super_func, Vec new);
    v....
    let s = derive1_class_option!(, call_super_func, String from "xxxx");
    s....
    derive1_class_option!(, call_super_func, Base non_virtual_func self, ...);
    self.w + derive1_class_option!(, call_super_func, Derive1 func2 self, i)
}

我们还有宏 call_super_func 没有定义,现在给出伪代码如下:

macro_rules! call_super_func
{
    ($($name_list:ident)*,$class_name:ident $func:ident $($params:tt)*) =>
    {
        // 伪代码
        if $name_list.contains(class_name)
        {
            let vtable_option = concat_idents($class_name.to_lowercase(), _vtable_option);
            vtable_option!(, call_class_func, $class_name $func $($params)*)
        }
        else
        {
            $class_name::$func($($params)*)
        }
    }
}

call_super_func 宏需要用过程宏来实现,规则宏无法实现,call_super_func 首先判断待调用的类是否在基类列表中,如果是,则继续调用 vtable_option 系列宏,进行下一步的判断,否则,转换为正常的函数调用,如下:

// derive1_class_option!(, call_super_func,... 宏展开如下:
fn func2_impl1(&self, i: i32) -> i32
{
    let v = Vec::new();
    v....
    let s = String::from("xxxx");
    s....
    base_vtable_option!(, call_class_func, Base non_virtual_func self, ...);
    self.w + derive1_vtable_option!(, call_class_func, Derive1 func2 self, i)
}

现在就剩下宏 call_class_func 了,仍然给出伪代码:

macro_rules! call_class_func
{
    ($($func_list:ident)*,$class_name:ident $func:ident $($params:tt)*) =>
    {
        // 伪代码
        if $func_list.contains(func)
        {
            ($class_name::VTABLE.$func)($($params)*)
        }
        else
        {
            $class_name::$func($($params)*)
        }
    }
}

call_class_func 宏判断待调用的方法是否为虚方法,如果是,转换为虚表调用,否则,转换为正常调用,如下:

// xxx_vtable_option!(, call_class_func,... 宏展开如下:
fn func2_impl1(&self, i: i32) -> i32
{
    let v = Vec::new();
    v....
    let s = String::from("xxxx");
    s....
    Base::non_virtual_func(self, ...);
    self.w + (Derive1::VTABLE.func2)(self, i)
}

至此我们可以正确处理各种 :: 的函数调用操作了。当然,使用 :: 来调用基类方法,不仅可以在重写方法中用,也可以在新定义的虚方法,甚至非虚方法中使用。

宏和分号

这里我们遇到了 Rust 宏的一个坑,我们之前定义了 vtable_option 系列宏,用于生成和初始化虚表。而在宏 call_super_func 中,我们重用 vtable_option 系列宏用来生成表达式。于是问题出现了。

我来简单描述一下这个问题,是关于宏调用的分号的,Rust 的宏可以有三种调用方式,如下:

println!("hello, world!");
println!["hello, world!"];
println!{"hello, world!"}

一般情况下,三种方式都是等价的,具体用选哪种括号,可以根据使用场景来选择,如果把宏当作函数,一般选择小括号,如果当作数组来用,一般选择中括号,如 vec! 宏。除此之外,一般用大括号。
各种括号的使用也有小小的区别,如上所示,大括号后面不需要分号,但是小括号和中括号有时需要分号,有时不需要。
那么什么时候需要呢?我们来看下面的例子:

macro_rules! def_struct { ($name:ident) => { struct $name {} }; }
def_struct!(A)

首先我定义了一个 def_struct 宏,作用是定义一个空的结构体,然后用宏 def_struct 来定义结构体 A。当我们尝试编译这段代码时,编译器会报错,如下:

 error: macros that expand to items must be delimited with braces or followed by a semicolon
  --> src/main.rs:12:12
12 | def_struct!(A)
   |            ^^^
help: change the delimiters to curly braces
12 | def_struct!{A}
   |            ~ ~
help: add a semicolon
12 | def_struct!(A);
   |               +

我的理解是用宏来生成函数作用域之外的定义时,如结构体、枚举以及函数等,宏调用需要分号结束。当然也可以改用大括号。
我们再看一个例子:

macro_rules! add { ($left:expr, $right:expr) => { $left + $right }; }
fn main()
{
    let i = add!(1, 2); + 3;
    println!("i = {}.", i);
}

这里我们用宏来生成表达式的一部分。不需要编译器,我们自己也能看出来,分号在这里并不合适,编译错误如下:

error: leading `+` is not supported
  --> src/main.rs:22:25
22 |     let i = add!(1, 2); + 3;
   |                         ^ unexpected `+`
help: try removing the `+`
22 -     let i = add!(1, 2); + 3;
22 +     let i = add!(1, 2);  3;

编译器虽然没有猜出我们的意图,但也指出了分号标志着表达式结束了。当然这两个问题都很好解决,如下:

def_struct!(A);
// 或者 def_struct!{A}
fn main()
{
    let i = add!(1, 2) + 3;
    println!("i = {}.", i);
}

然而当遇到宏回调时,情况变得复杂了,如下:

macro_rules! test_callback
{
    ($callback:tt $($params:tt)*) => { $callback! ($($params)*) };
}
...
test_callback!(def_struct A);
fn main()
{
    let i = test_callback!(add 1, 2) + 3;
    println!("i = {}.", i);
}

在这里,我们根据之前的经验,特别注意了宏调用的分号,但是编译器仍然有意见,如下:

error: macros that expand to items must be delimited with braces or followed by a semicolon
  --> src/main.rs:3:51
3  |     ($callback:tt $($params:tt)*) => { $callback! ($($params)*) };
   |                                                   ^^^^^^^^^^^^^
...
11 | test_callback!(def_struct A);
   | ---------------------------- in this macro invocation
   = note: this error originates in the macro `test_callback` (in Nightly builds, run with -Z macro-backtrace for more info)
help: change the delimiters to curly braces
3  |     ($callback:tt $($params:tt)*) => { $callback! {} };
help: add a semicolon
3  |     ($callback:tt $($params:tt)*) => { $callback! ($($params)*); };

本来我们以为 test_callback 宏调用加了分号就可以了,没想到编译器要求内部的宏调用也必须加分号,我们也只好乖乖听话,为内部的宏调用加上分号:

macro_rules! test_callback
{
    ($callback:tt $($params:tt)*) => { $callback! ($($params)*); };
}

但是编译器仍然没有放过我们,又有了下面的警告:

warning: trailing semicolon in macro used in expression position
  --> src/main.rs:3:64
3  |     ($callback:tt $($params:tt)*) => { $callback! ($($params)*); };
   |                                                                ^
...
20 |     let i = test_callback!(add 1, 2) + 3;
   |             ------------------------ in this macro invocation
   = note: `#[warn(semicolon_in_expressions_from_macros)]` on by default
   = warning: this was previously accepted by the compiler but is being phased out; it will become a hard error in a future release!
   = note: for more information, see issue #79813 <https://github.com/rust-lang/rust/issues/79813>
   = note: this warning originates in the macro `test_callback` (in Nightly builds, run with -Z macro-backtrace for more info)

编译器认为我们在宏内部调用其它宏不应该加分号,而我们也认可当前场景中分号的存在确实多余。但是加分号不行,不加分号也不行,我们该怎么办呢?
我们希望宏 test_callback 即能用于生成函数域的表达式的一部分,也用于能生成函数域之外的定义。可是如果需要将 test_callback 宏在不同的场景下拆分为两个,那么意味着之前我们设计的 vtable_option 系列宏都将面临拆分的问题。
当然了,这只是一个警告,不影响编译,但警告通常意味着代码存在着隐患,所以良好的代码也应该从 0 警告开始。而且编译器还说,不排除将来将该警告升级为错误。

问题的解决

我们注意到,之前编译器报错时曾建议我们用大括号:

help: change the delimiters to curly braces
3  |     ($callback:tt $($params:tt)*) => { $callback! {} };

我们来试一下:

macro_rules! test_callback
{
    ($callback:tt $($params:tt)*) => { $callback! {$($params)*} };
}

编译通过,没有错误和警告。问题解决。
结论就是,用大括号在宏调用中具有最广泛的适应性。当我们需要一个用于各种场合的回调宏时,大括号是唯一的选择。

宏调用分号的坑已经填好了,我们将在下一节实现将函数调用 String::from("xxxx") 转换为宏调用 derive1_class_option!(, call_super_func, String from "xxxx") 的代码。

本来这一节是要继续实现虚方法的,但我们遇到了问题。我们要先将问题解决才能够继续。
之前我们将数据成员从类中拆分出来成为纯数据类,这样做的好处是:

  1. 每个类都可以方便的管理自己的虚表;
  2. 责任清晰:数据类负责数据,类自身负责虚表,数据类的构造函数负责初始化数据,类自身的构造函数负责初始化虚表,由数据类负责数据相关方法,类自身负责导出虚方法;

然而,但是很多情况下,责任没有办法划分的这样清楚,如:虚函数可以调用非虚函数,非虚函数也可以调用虚函数,而非虚函数定义于数据类,是没有虚表的。
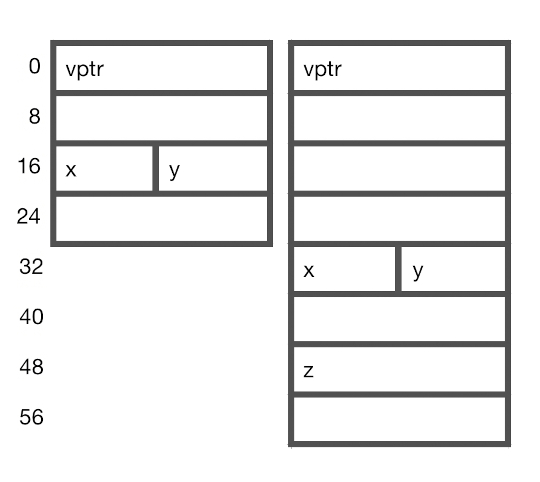
一般情况下,我们可以用数据类的对象地址负偏移一个指针得到虚表指针地址,但是,如果类指定了对齐属性,想要获得虚表指针的地址就比较麻烦了。而且如果基类的对齐和派生类的对齐属性不一样,问题就更大了,如:

#[repr(C, align(16))]
pub struct BaseData
{
    x: i32,
    y: i32,
}
#[repr(C, align(16))]
pub struct Base
{
    vptr: &'static BaseVTable,
    data: BaseData,
}
#[repr(C, align(32))]
pub struct Derive1Data
{
    base: Base,
    z: i64,
}
#[repr(C, align(32))]
pub struct Derive1
{
    vptr: &'static Derive1VTable,
    data: Derive1Data
}

如上,基类和派生类分别指定了16字节对齐和32字节对齐的属性,为直观起见,我们用下图来表示两个类的内存模型,左为基类,右为派生类:
不同对齐属性的基类和派生类.jpg
我们看到,派生类和基类的内存模型是不兼容的,因而不能将派生类对象强制转换为基类,类机制能够正常运行的基础塌了。这大概是这么长时间以来我们遇到的最大的挫败了。

为此我们需要对对象模型进行重构,以保证在任何情况下,派生类和基类的内存模型都能够兼容。
回忆一下,我们期望的类定义如下:

#[class]
pub struct Base
{
    x: i32,
    y: i32,
    pub fn new(x: i32, y: i32) -> Self { Base{ x, y } }
    pub virtual fn func1(&self) -> i32 { self.x }
    pub virtual fn func2(&self, i: i32) -> i32 { self.y + i }
}
#[class]
pub struct Derive1 : Base
{
    z: i32,
    pub fn new(x: i32, y: i32, z: i32) -> Self { Derive1 { base: Base::new(x, y), z} }
    pub override fn func1(&self) -> i32 { self.z }
    pub virtual fn func3(&self) -> i32 { self.z }
}
#[class]
pub struct Derive2 : Derive1
{
    pub fn new(x: i32, y: i32, z: i32) -> Self { Derive2 { base: Derive1::new(x, y, z) } }
    pub override fn func2(&self, i: i32) -> i32 { Base::func2(self, i) + 200 }
    pub override fn func3(&self) -> i32 { Derive1::func3(self) + 200 }
}

这次,我们取消数据类,直接将数据成员放置于类的定义,基类重新展开如下:

#[repr(C)]
pub struct BaseVTable
{
    func1: fn(this: &Base) -> i32,
    func2: fn(this: &Base, i: i32) -> i32,
}
#[repr(C)]
pub struct Base
{
    vptr: &'static BaseVTable,
    x: i32,
    y: i32,
}
impl Base
{
    const TYPEINFO: TypeInfo = TypeInfo
    {
        base_class: None,
    };
    const VTABLE: BaseVTable = BaseVTable
    {
        _type_info: &Self::TYPEINFO,
        func1: Self::func1_impl0,
        func2: Self::func2_impl0,
    };
    pub fn new(x: i32, y: i32) -> Self
    {
        Base { vptr: &Self::VTABLE, x, y }
    }
    fn func1_impl1(&self) -> i32 { self.x }
    fn func1_impl0(this: &Base) -> i32 { this.func1_impl1() }
    pub fn func1(&self) -> i32 { (self.vptr.func1)(self) }
    fn func2_impl1(&self, i: i32) -> i32 { self.y + i }
    fn func2_impl0(this: &Base, i: i32) -> i32 { this.func2_impl2(i) }
    pub fn func2(&self, i: i32) -> i32 { (self.vptr.func2)(self, i) }
}

我们将虚函数拆分成了三个函数:

  1. 一个函数以 _impl1 为后缀,为函数的原始定义;
  2. 一个函数以 _impl0 为后缀,将 &self 参数更改为 this: &Base,并在内部转调 _impl1 后缀的函数,是虚表的需要;
  3. 一个函数名不加后缀,用来产生虚表调用。

我们没有将 _impl0 和 _impl1 合并为一个函数,是为了避免在函数体内进行将 self 替换为 this 的操作。而且虽然我们没有将函数合并,但是编译器会帮我们做,依然是 0 运行时开销。
接下来 Derive1 类应该展开为如下的形式:

#[repr(C)]
struct Derive1VTable
{
    func1: fn(this: &Base) -> i32,
    func2: fn(this: &Base, i: i32) -> i32,
    func3: fn(this: &Derive1) -> i32,
}
#[repr(C)]
pub struct Derive1
{
    base: Base,
    z: i32,
}
impl Derive1
{
    const TYPEINFO: TypeInfo = TypeInfo
    {
        base_class: Some(&Base::TYPEINFO),
    };
    const VTABLE: Derive1VTable = Derive1VTable
    {
        _type_info: &Self::TYPEINFO,
        func1: Self::func1_impl0,
        func2: Base::VTABLE.func2,
        func3: Self::func3_impl0,
    };
    fn new(x: i32, y: i32, z: i32) -> Self { ... }
    fn func1_impl1(&self) -> i32 { self.z }
    fn func1_impl0(this: &Base) -> i32
    {
        let this: &Self = unsafe { reinterpret_cast(this) };
        this.func1_impl1()
    }
    fn func3_impl1(&self) -> i32 { self.z }
    fn func3_impl0(this: &Derive1) -> i32 { this.func3_impl1() }
    pub fn func3(&self) -> i32 { ... }
}

但是问题来了,在新的模型中,派生类不能直接访问虚指针,因此我们无法初始化虚指针,也无法通过虚指针来调用方法。
不过我们都知道类的第一个元素就是虚指针,那么事情就好办了。

fn _vptr(&self) -> &DeriveVTable
{
    unsafe
    {
        let vptr = self as *const Self as *const *const Derive1VTable;
        &**vptr
    }
}
fn _init_vptr(&mut self)
{
    unsafe
    {
        let vptr = self as *mut Self as *mut *const Derive1VTable;
        *vptr = &Self::VTABLE;
    }
}

有了这两个方法,我们就能够在派生类中初始化虚表,及产生虚表调用了。

fn new(x: i32, y: i32, z: i32) -> Self
{
    let mut ret = Derive1 { base: Base::new(x, y), z };
    ret._init_vptr();
    ret
}
pub fn func3(&self) -> i32 { (self._vptr().func3)(self) }

接下来,我们展开 Derive2 类,如下:

type Derive2VTable = Derive1VTable;
#[repr(C)]
pub struct Derive2
{
    base: Derive1,
}
impl Derive2
{
    const TYPEINFO: TypeInfo = TypeInfo
    {
        base_class: Some(&Derive1::TYPEINFO),
    };
    const VTABLE: Derive2VTable = Derive2VTable
    {
        _type_info: &Self::TYPEINFO,
        func1: Derive1::VTABLE.func1,
        func2: Self::func2_impl,
        func3: Self::func3_impl,
    };
    fn _vptr(&self) -> &DeriveVTable
    {
        unsafe
        {
            let vptr = self as *const Self as *const *const Derive2VTable;
            &**vptr
        }
    }
    fn _init_vptr(&mut self)
    {
        unsafe
        {
            let vptr = self as *mut Self as *mut *const Derive2VTable;
            *vptr = &Self::VTABLE;
        }
    }
    pub new(x: i32, y: i32, z: i32) -> Self
    {
        let mut ret = Derive2 { base: Derive1(x, y, z) };
        ret._init_vptr();
        ret
    }
    fn func2_impl1(&self, i: i32) -> i32 { (Base::VTABLE.func2)(self, i) + 200 }
    fn func3_impl1(&self) -> i32 { (Derive1::VTABLE.func3)(self) + 200 }
    fn func2_impl0(this: &Base, i: i32) -> i32
    {
        let this: &Self = unsafe { reinterpret_cast(this) };
        this.func2_impl1(i)
    }
    fn func3_impl0(this: &Derive1) -> i32
    {
        let this: &Self = unsafe { reinterpret_cast(this) };
        this.func3_impl1()
    }
}

到这里新的模型以及可以工作了,但我们不能忘记重构的初衷,我们来验证下新模型是否解决了不同对齐属性的内存模型兼容问题,如下:

#[repr(C, align(16))]
pub struct Base
{
    vptr: &'static BaseVTable,
    x: i32,
    y: i32,
}
#[repr(C, align(32))]
pub struct Derive1
{
    base: Base,
    z: i64,
}

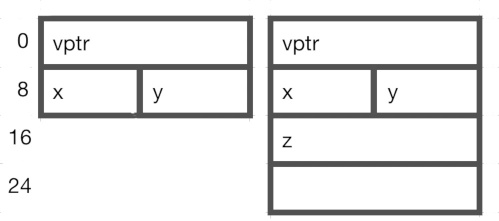
同上面的模型,此处的基类和派生类也分别指定了16字节对齐和32字节对齐的属性,新内存模型如下图,左为基类,右为派生类:
不同对齐属性的基类和派生类2.jpg
我们看到,对齐方式不会影响派生类和基类的兼容性,而且还紧凑了很多。理论上,在新模型中基类是整体作为派生类的第一个成员而存在的,因此派生类和基类的内存模型一定是兼容的。
至此新模型验证完毕,接下来我们将在新模型上继续工作。

上一节我们实现了虚表的定义及初始化操作,接下来要实现虚函数。回顾一下我们的类定义,及展开后的代码:

#[class]
pub struct Base
{
    ...
    virtual fn func1(&self) -> i32 { this.x }
    virtual fn func2(&self, i: i32) -> i32 { this.y + i }
}
// 展开后的虚表及虚函数实现
#[repr(C)]
pub struct BaseVTable
{
    func1: fn(this: &Base) -> i32,
    func2: fn(this: &Base, i: i32) -> i32,
}
impl Base
{
    ...
    fn func1_impl(this: &Base) -> i32 { this.data.x }
    fn func2_impl(this: &Base, i: i32) -> i32 { this.data.y + i }
    pub fn func1(&self) -> i32 { (self.vptr.func1)(self) }
    pub fn func2(&self, i: i32) -> i32 { (self.vptr.func2)(self, i) }
}

可以看到类定义中的函数原型的 &self 参数展开后到了虚表中变成了 this: &Base,这是因为如果我们仍然使用 self 关键字,在虚表类中会被理解为是 BaseVTable 类型。实现中,我们用 func1_impl 作为实现的方法名,然后用 func1 产生虚表调用。
此前为了生成虚表,我们定义了宏 func1_type、func2_type 宏,返回函数的原型,实现函数时,也需要函数原型,于是我们想到重用之前的宏,如下:

#[macro_export] macro_rules! func1_type
{
    ($($name:ident $block:block)?) =>
    { fn $($name)? (this: &Base) -> i32 $($block)? };
}
#[macro_export] macro_rules! func2_type
{
    ($($name:ident $block:block)?) =>
    { fn $($name)? (this: &Base, i: i32) -> i32 $($block)? };
}

宏不传任何参数时,可用于生成虚表,传递函数名和代码块就可以用来生成函数实现,如下:

func1_type!(func1_impl { this.data.x });
func2_type!(func2_impl { this.data.y + i });

看上去很完美,我们用 cargo expand 展开也可以得到正确的结果。但是编译器有不同的意见,如下:

error[E0425]: cannot find value `this` in this scope
  --> class_impl/src/lib.rs:50:30
   |
50 |     func1_type!(func1_impl { this.data.x });
   |                              ^^^^ not found in this scope
error[E0425]: cannot find value `this` in this scope
  --> class_impl/src/lib.rs:52:30
   |
52 |     func2_type!(func2_impl { this.data.y + i });
   |                              ^^^^ not found in this scope
error[E0425]: cannot find value `i` in this scope
  --> class_impl/src/lib.rs:52:44
   |
52 |     func2_type!(func2_impl { this.data.y + i });
   |                                            ^ not found in this scope

这里因为由 Rust 宏生成的变量有一个隐形的作用域,宏生成的变量不会污染宏展开处的上下文。这是 Rust 宏和 C++ 宏最大的不同了。
以func2_impl 为例:

fn                               // 宏展开
func2_impl                       // 宏参数
(this: &Base, i: i32) -> i32     // 宏展开
{ this.data.y + i }              // 宏参数

因为函数原型中的变量 this 和 i 是宏展开所得到,而函数体中使用的变量 this 和 i 是由宏参数传递进来,作用域不同,所以此 this 非彼 this,此 i 也非彼 i。
这也是 Rust 安全性的体现,我们不用担心宏生成的变量会意外的覆盖了我们正在使用的变量,从而导致非预期的行为发生。这个行为在 Rust 中被称之为卫生性
但是有时我们需要在宏中生成变量,就如我们的 func2_type 宏一样,我们希望它生成一个可以编译的函数,办法也是有的,就是显示捕获变量,如下:

macro_rules! func1_type
{
    () => { fn (this: &Base) -> i32 };
    ($name:ident $this:ident $block:block) =>
    { fn $name ($this: &Base) -> i32 $block };
}
macro_rules! func2_type
{
    () => { fn (this: &Base, i: i32) -> i32 };
    ($name:ident $this:ident $i:ident $block:block) =>
    { fn $name ($this: &Base, $i: i32) -> i32 $block };
}

为了生成完整的函数,我们添加了新的捕获变量,但是当我们生成函数原型时,我们并不需要捕获变量来使代码复杂化。这导致我们的宏规则要拆分为两条,现在我们可以通过下面的方法来生成完整的函数:

func1_type!(func1_impl this { this.data.x });
func2_type!(func2_impl this i { this.data.y + i });

宏卫生性是 Rust 安全性的体现,让我们可以编写更安全的宏。但有时也会带给我们一些困扰,好在 Rust 有解决办法。
但是,我们本来希望重用已有的宏来简化代码,现在看来反而更加复杂了。这与我们的初衷不符,我们还是在实现虚函数时老老实实的再次生成函数原型好了。但是当我们为派生类重写的方法生成函数原型时,遇到了问题。回顾一下,派生类 Derive2 重载了 func2 和 func3 两个方法:

#[class]
pub struct Derive2 : Derive1
{
    // 好像哪里不对?
    override fn func2(&self, s: &str) -> Vec<i32> { ... }
    override fn func3(&self, f: f64) -> (i32, &str) { ... }
}

那么这两个方法的函数原型中的 this 应该是什么类型呢?从直觉来讲,应该是跟随派生类的类型,如下:

// 虚表定义函数原型:
func2: fn(this: &Derive2, s: &str) -> Vec<i32>,
func3: fn(this: &Derive2, f: f64) -> (i32, &str),
// 函数实现:
fn func2_impl(this: &Derive2, s: &str) -> Vec<i32> { ... }
fn func3_impl(this: &Derive2, f: f64) -> (i32, &str) { ... }

这样实现有两个问题:

  1. 我们没有重载的 func1 应该是什么类型呢?如果也跟随 Derive2 的类型,那么就无法用 Derive1::VTABLE::func1 直接赋值,因为类型不同。为了虚表能够正常工作,我们要生成额外的代码,带来了不必要的开销;
  2. 如果重载的方法将函数原型写错了,如上,我们不仅无法发现问题,而且会生成可以正常编译代码。但运行时安全性被破坏了。

所以我决定虚函数的类型在它第一次定义时确定,也就是用 virtual 关键字标记时确定。那么 Derive2 的虚表和实现应该如下面的代码所示:

// 虚表定义函数原型:
func2: fn(this: &Base, i: i32) -> i32,
func3: fn(this: &Derive1) -> i32,
// 函数实现:
fn func2_impl(this: &Base, s: &str) -> Vec<i32> { ... }
fn func3_impl(this: &Derive1, f: f64) -> (i32, &str) { ... }

这时编译器应该很容易发现 func2_impl 和 func2 的类型不一致,从而拒绝编译,以此保障我们生成的代码在运行时的安全性。但是派生类并没有足够的信息来知道两个方法的 this 参数应该是什么类型,这也是我们希望重用 xxx_type 宏的原因,但是在刚刚的实践中,重用 xxx_type 并没有给我们生成代码带来便利,也会使得函数原型错误的问题难以发现。这次我们要换一个方式。我们只需要知道 this 的类型即可,如下:

macro_rules! func1_type
{
    () => { fn (this: &Base) -> i32 };
    (this) => { Base };
}
macro_rules! func2_type
{
    () => { fn (this: &Base, i: i32) -> i32 };
    (this) => { Base };
}
macro_rules! func3_type
{
    () => { fn (this: &Derive1) -> i32 };
    (this) => { Derive1 };
}

于是,我们这样实现重写的虚函数:

// 虚表定义函数原型:
func2: func2_type!(),
func3: func3_type!(),
// 函数实现:
fn func2_impl(this: &func2_type!(this), s: &str) -> Vec<i32> { ... }
fn func3_impl(this: &func3_type!(this), f: f64) -> (i32, &str) { ... }

因为那个粗心的程序员把函数原型写错了,编译器会提示类型不匹配。虽然基于宏展开代码错误信息的可读性不太友好,但总好过不报错。
程序员看到错误信息,修改了函数原型为正确的形式:

#[class]
pub struct Derive2 : Derive1
{
    w: i32,
    override fn func2(&self, i: i32) -> i32 { self.w + ... }
    override fn func3(&self) -> i32 { self.w + ... }
}

现在开始实现函数了:

fn func2_impl(this: &func2_type!(this), i: i32) -> i32
{
    this.data.w + ...
}
fn func3_impl(this: &func3_type!(this)) -> i32
{
    this.data.w + ...
}

我们刚刚解决了虚表初始化及函数原型不匹配的问题,新的问题又来了。
在重写虚方法实现中访问了 Derive2 的数据成员 w,在派生类中访问自己的数据成员本来不是什么问题,但正如我们上文所讲的,func2_impl 中的 this 类型是 &Base,而 func3_impl 中的 this 类型是 &Derive1,他们都无法访问 Derive2 的任何数据。
其实我们都知道上面的 this 都是 &Derive2 类型,只是为了函数原型兼容,才写成了基类的类型,那么这事就好办了。

fn func2_impl(this: &func2_type!(this), i: i32) -> i32
{
    let this: &Self = unsafe { reinterpret_cast(this) }; 
    this.data.w + ...
}
fn func3_impl(this: &func3_type!(this)) -> i32
{
    let this: &Self = unsafe { reinterpret_cast(this) }; 
    this.data.w + ...
}

我们之前实现了一个无条件强制类型转换的函数,用在这里再合适不过了。而且 reinterpret_cast 的转换是 0 开销的,也不担心有额外的代价。
好像函数实现还不太完整,下一节我们把 ... 的部分补上。